Mole Mapping at Home: Documentation That Actually Helps a Dermatologist
The strongest melanoma signal is change over time — and it is exactly the thing a single appointment is structurally unable to see.
Read the preview
From the DermApproved blog, in Skin Cancer and Mole Checks: the photo that actually helps your dermatologist. Change over time is the strongest melanoma signal there is — and it's the one thing a single appointment can't see. Your phone can capture it. Most phone photos can't be compared to each other, and there's one reason why. For the full breakdown, visit dermapproved.com/blog.
A single appointment can only see a single moment
Consider what a dermatologist is actually doing when they examine a back for the first time. They are assessing forty or eighty pigmented lesions against population norms and against each other, in one sitting, with no history. What they cannot do — what nobody could do — is tell you whether the spot below your left shoulder blade was that size in March.
That missing axis is not a minor gap. Evolution over time is the signal with the most diagnostic weight in pigmented lesion assessment, which is why it was appended to the ABCD criteria as the E in the first place. A lesion that is unusual but stable is a very different proposition from one that is unremarkable but growing.
Clinics solve this with equipment. Total body photography captures a standardised baseline set of images; sequential digital dermoscopy re-photographs individual lesions at high magnification at intervals and compares them. A systematic review covering fourteen studies and more than twelve thousand people found that individuals undergoing total body photography trended toward lower Breslow thickness and a higher proportion of in-situ melanomas — that is, cancers caught earlier. Sequential monitoring also reduces the number of benign moles excised per melanoma found, which matters more than it sounds: over-excision is the other failure mode in this field, and it leaves scars.
That infrastructure is reserved, reasonably, for high-risk patients. But the underlying principle isn't equipment-dependent. It is comparison. And comparison is something you can generate at home if — and only if — your images are actually comparable.
Comparability is the entire technique
Here is the failure that makes most home photography worthless: two pictures of the same mole taken four months apart, one in bathroom light at arm's length, one by a window from closer in. The mole looks bigger and browner in the second. It isn't. You changed the distance and the colour temperature, and you have no way to separate that from the lesion.
Everything below exists to eliminate that ambiguity, and each item is a variable you are removing rather than a technique you are learning.
Fix the light first. Use the same room, the same time of day, the same lamp, and turn off any other source. Daylight through a window is fine as a rule but treacherous in practice because it changes seasonally. A consistent artificial light you control beats a better light you don't. Skip flash on close-ups — it flattens texture and blows out surface detail, which is the detail you're trying to track.
Then fix the distance. Close-ups should be shot from a repeatable distance, which sounds fussy until you see two images of the same lesion taken from twenty and thirty centimetres. Marking a spot on the floor for full-body frames and using a fixed object — a countertop edge, a doorframe — as the brace for close-ups is inelegant and works. Avoid digital zoom entirely; move the camera instead, and lock focus before you shoot.
Put a scale in the frame. This is the single highest-value habit and almost nobody does it. A ruler, a coin, or an adhesive paper measuring strip beside the lesion converts a photo from an impression into a measurement. Without one, "it looks bigger" is unfalsifiable. With one, it's arithmetic, and arithmetic is what survives an argument with yourself at two in the morning.
Fix the body position too, because skin moves. A mole photographed with the arm raised and then with the arm down will genuinely change shape, and you will have documented your own posture rather than a lesion. Decide on a position per region — arms at forty-five degrees for the torso, palms forward, feet marked — and repeat it exactly. Same underwear, or none, for the same reason.
Finally, date everything and never crop. Cropping destroys the framing consistency you just spent effort building. Our progress photo tracker exists specifically to enforce all of this — it holds the prep checklist, keeps the dated series together, and puts any two dates side by side, which is the comparison a dermatologist actually wants to see.
Numbering a body so the record survives a year
A folder of two hundred undifferentiated mole photos is not a record. It's a haystack, and it will be abandoned within a year.
The fix is a map with a numbering scheme, built once. Divide the body into regions — front torso, back torso, left arm, right arm, left leg, right leg, head and neck, hands and feet — and number lesions within each region rather than globally, so that adding a new spot to your left arm doesn't renumber your back. Photograph each region as a whole first: that overview image is what lets you locate lesion 4 next time, and it is also the image that makes the ugly duckling sign visible.
Landmarks beat coordinates. "Left scapula, four centimetres below the inferior angle" survives weight change and time; "upper back, middle-ish" does not. Where a mole sits in a featureless area, note its position relative to two fixed things — a scar, a nipple, the spine — rather than one.
Our mole map tool does this bookkeeping for you: drop a marker per spot on a body diagram, log dated observations against each one, and print the whole thing for an appointment. The printing part matters more than it should. A clinician with fifteen minutes will look at a single printed page; they will not scroll through your camera roll, and asking them to is the most common way good documentation fails to become useful documentation.
One piece of advice that runs against the instinct: do not photograph everything. A record of every freckle is a record you will stop maintaining. Track the ones that meet a threshold — anything you or a clinician has flagged, anything larger than about six millimetres, anything visibly different from its neighbours, and any new lesion appearing after roughly age thirty. Fifteen well-tracked spots beat two hundred abandoned ones.
The ugly duckling is a pattern, not a per-mole test
The ABCDE criteria — asymmetry, border, colour, diameter, evolution — are taught first because they're teachable, and they are genuinely useful for evaluating a single lesion in isolation. Our ABCDE mole check walks through them properly. But they also generate a great deal of anxiety, because plenty of entirely benign moles are mildly asymmetric with an irregular border, and a strict reading flags half a normal back.
The complementary idea, introduced by Grob and Bonerandi in 1998, is more powerful and much less taught. A person's moles tend to resemble one another — they share a family look, driven by that individual's own biology. A melanoma frequently doesn't belong to the family. It is the ugly duckling: the one that looks like it wandered in from someone else's back.
This is not soft reasoning. When researchers showed standardised back images to thirty-four observers — pigmented lesion experts, general dermatologists, nurses, and eight people with no clinical training at all — and asked simply which lesions looked different from the rest, all five melanomas in the set were flagged as different, along with only three of 140 benign lesions. Overall sensitivity for melanoma detection was 0.9. Among the non-clinicians it was 0.85.
That last number is the reason this section exists. Pattern recognition across a whole region is a task ordinary people perform nearly as well as specialists, and it requires no training in dermoscopy. It does, however, require seeing the whole region at once — which is precisely what your region overview photographs give you and what examining moles one at a time in a mirror does not. Look at the picture of your back as a picture, not as a checklist. Ask which one your eye keeps returning to.
Where the phone stops being useful
There is a version of this article that ends with "and there's an app for that." This is not it.
A systematic review of algorithm-based smartphone apps assessing skin cancer risk found nine studies covering six identifiable apps, and the picture was poor: small studies, poor methodological quality, high rates of unevaluable images, and — importantly — lesion selection and photography performed by clinicians rather than by the users the apps are sold to. Of the two CE-marked apps available for download at the time, one achieved 80 percent sensitivity for malignant or premalignant lesions in two studies; the other, evaluated in a single study of fifteen lesions containing five melanomas, detected none of them. Zero percent sensitivity.
Eighty percent sensitivity means one in five cancers missed, in studies where the photographs were taken by professionals. Applied to a real user photographing their own back in bathroom light, it is not a screening tool. It is a coin with a good marketing budget.
The honest framing is that your phone is an excellent camera and a poor diagnostician. Documentation is the job it does well. Judgement is the job that belongs to a dermoscopic exam, where a clinician is looking at pigment network structure, vascular patterns and features that simply do not exist at the resolution and lighting of a phone photograph.
So the escalation rules are independent of your archive. A new lesion in adulthood, any spot that bleeds without trauma, any sore that doesn't heal within a month, rapid change over weeks rather than months, a mole that becomes itchy or tender, or a spot your eye keeps snagging on — all of those go to a clinician now, regardless of what the photos show. Documentation makes a good appointment better. It never converts a needed appointment into an unneeded one, and reassurance from a comparison you made yourself is the exact wrong use of this method.
Watching is not preventing
There's an uncomfortable asymmetry in this whole enterprise: surveillance changes when a cancer is found, not whether one develops. A meticulous mole archive maintained by someone who doesn't wear sunscreen is a well-documented accumulation of damage.
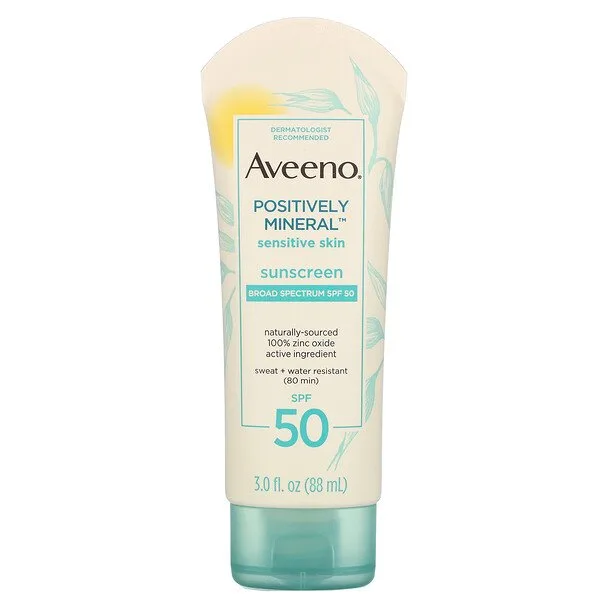
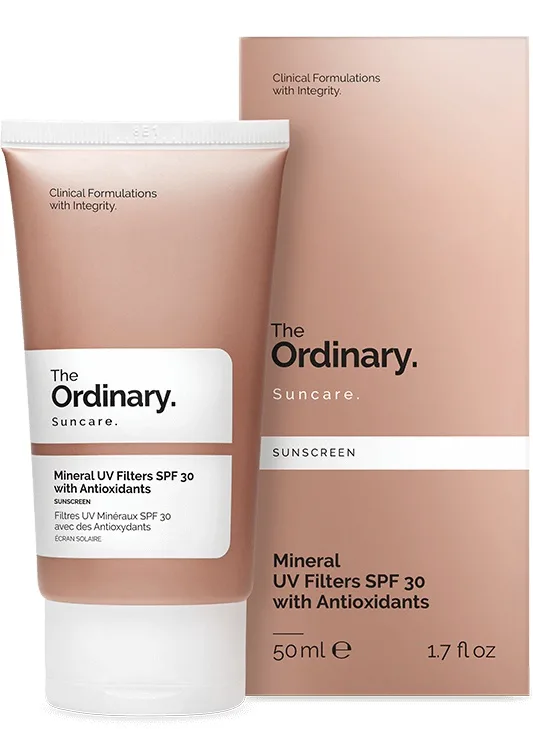
The prevention half is unglamorous by comparison and considerably more effective per unit of effort. Daily sun protection on the sites that actually accumulate exposure — face, ears, neck, forearms, and the back of the hands, which almost everyone forgets — is the intervention that changes the trajectory. Broad-spectrum products with high-opacity mineral filters like zinc oxide are a reasonable default for skin already under surveillance: Blue Lizard Sport Mineral Sunscreen SPF 50+ holds up for outdoor exposure, Aveeno Positively Mineral Sensitive Skin Sunscreen SPF 50 suits reactive skin, and The Ordinary Mineral UV Filters SPF 30 with Antioxidants is a lightweight daily option for people who will otherwise skip it. Our dermatologist-recommended shortlist is a reasonable place to start if you're replacing one.
There's also a category that home photography catches well and that people consistently misfile. Rough, scaly, sandpapery patches on sun-exposed skin that come and go and never fully resolve are not moles, and they are not cosmetic. Actinic keratoses are precursor lesions with a real if small rate of progression, and they respond to treatment — which is worth knowing before somebody reaches for a home remedy. Our actinic keratosis pathway covers what actually works, and we deal with the freezing kits sold for home use in a specific answer, because the short version — that they are the wrong tool for a lesion that needs diagnosing first — deserves more than a footnote.
Do both halves. Photograph consistently, in the same light, with a ruler in frame, on a numbered map you can print. Then wear the sunscreen, so that in ten years the archive is a record of nothing happening.
Products mentioned
Independently reviewed and scored — the real products behind this piece.

- Therapy guide Actinic keratosis The precursor lesions home photography catches and people misfile
- Ranked list Best Dermatologist-Recommended Sunscreens Starting point for the prevention half of surveillance
- Ingredient Zinc Oxide High-opacity broad-spectrum filter for skin already under surveillance
- Question Can I freeze it myself with a wart kit from the pharmacy? Why home freezing kits are the wrong tool for an undiagnosed lesion
References
- The 'ugly duckling' sign: identification of the common characteristics of nevi in an individual as a basis for melanoma screening — Archives of Dermatology, 1998
- The "ugly duckling" sign: agreement between observers — Archives of Dermatology, 2008
- The Value of Total Body Photography for the Early Detection of Melanoma: A Systematic Review — International Journal of Environmental Research and Public Health, 2021
- The importance of total-body photography and sequential digital dermatoscopy for monitoring patients at increased melanoma risk — JDDG: Journal der Deutschen Dermatologischen Gesellschaft, 2020
- Algorithm based smartphone apps to assess risk of skin cancer in adults: systematic review of diagnostic accuracy studies — BMJ, 2020
Every cited link is verified to resolve to the paper named. Where a source could not be independently confirmed, it is listed without a link rather than pointing you somewhere wrong.
Frequently asked
How often should I photograph my moles?
Every three to four months for tracked lesions is a reasonable cadence for most people, and monthly for anything a clinician has specifically asked you to watch. More frequent than that produces intervals too short for real change to show and makes the archive tedious enough to abandon. The consistency of the images matters far more than the frequency.
What makes a mole photo actually comparable to an earlier one?
Four fixed variables and one addition: same lighting source and time of day, same camera distance with no digital zoom, same body position, same framing with no cropping — plus a ruler or coin in the frame for scale. Without the scale reference, "it looks bigger" is an impression that can't be checked. With one, it's a measurement.
Is the ugly duckling sign better than checking ABCDE?
They answer different questions. ABCDE evaluates one lesion in isolation; the ugly duckling compares a lesion against your own other moles, which tend to share a family resemblance. In a study where observers were shown standardised back images, all five melanomas and only 2.1% of benign lesions were flagged as different — and untrained observers reached a sensitivity of 0.85. Use both, and view whole regions rather than one mole at a time.
Can a skin cancer app tell me if a mole is dangerous?
No. A systematic review of algorithm-based apps found small, poor-quality studies, and among CE-marked apps the results ranged from 80% sensitivity down to 0% in one small study containing five melanomas. Those figures came from images captured by clinicians, not users. Treat these apps as a prompt to book an appointment at most, never as a reason not to.
How do I photograph moles on my own back?
Use a tripod or a phone stand with a timer and a marked floor position rather than a hand-held mirror shot, which changes distance and angle every time. A second person is better if available. For the region overview images especially, a fixed camera position is what makes the series comparable across a year.
What should I actually bring to a skin check appointment?
One printed page: a body map with numbered lesions, dates for each observation, and a short note on anything that changed. Add printed side-by-side comparisons for the two or three spots you're most concerned about. A clinician with fifteen minutes will read a page; they will not scroll a camera roll, and unstructured photo dumps are the most common way careful documentation goes unused.